How to build a Pinwheel
Step 1: Project Preparation
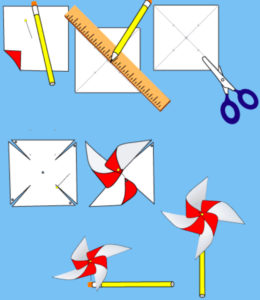
Gather the materials needed for making a pinwheel. If you are doing this project with a group of children, pre-cut the 6″ (15 cm) paper squares.
Step 2: Cut Square
Cut a 6″ (15 cm) square of paper
Step 3: Cut
Use the pencil and ruler to draw two diagonal lines, corner-to-corner, that cross at the square’s center. Mark the center point and mark a point 2¾” (7 cm) from each corner on the diagonal line.
Cut on the diagonal line from each corner up to the marked point. Erase pencil marks, except for the center point.
Step 4: Assemble
- Using the straight pin, punch a hole in the center and at every other point (about ¼” from the tip.)
- Poke the pin through one of the point holes and curl the point toward the center. Don’t fold!
- Curl each pierced point, in turn, toward the center and poke the pin through the holes.
- Push the pin through the center hole of the pinwheel.
- Holding the pencil on a flat surface with one hand, push the pin into the side of the eraser.
Step 5: Finish
You now have a pinwheel! Hold the pinwheel in your hand and swish it around. The pinwheel should rotate on the pin. Take the pinwheel outside on a breezy day and see it whirl like crazy!
Tip: If your pinwheel doesn’t rotate freely, it is probably rubbing against the pencil. You can fix this problem by inserting the pin into the eraser at a slight upward angle, or by slipping a small bead onto the pin before inserting it into the eraser.